How to Check Cpu and Gpu Temp Windows 10
In this post, we show you how to check and monitor Graphic Card's GPU temperature on your Windows 11/10 PC. . It is always good to know how to check GPU temperature whether you are a gamer, video editor, or graphics designer. The normal GPU temperatures range lies within the 65 to 85°C (149 to 185°F) range. In case the GPU temperature is exceeding the maximum value like if it is around 100°C, you can try regulating the sustainable heat levels accordingly only if you know the current GPU temperature. Overheating of GPU can result in serious hardware damage, so it is always recommended to keep a check on GPU temperature.
Now, if you want to determine the current temperature of your graphics card, this article will help you. In this post, we are going to list down various free software that will enable you to monitor GPU temperature. So, let us check out what are these free GPU temperature monitoring software for Windows 11/10.
How to check the GPU Temperature in Windows 11/10
Here are the free software using which you can monitor GPU temperature in Windows 11/10:
- Windows built-in Task Manager
- HWMonitor
- GPU-Z
- Sidebar Diagnostics
- Open Hardware Monitor
Let us discuss these freeware in detail now!
1] Windows built-in Task Manager
The built-in Task Manager in Windows is a handy utility to manage processes, services, startup apps, and more. It also lets you monitor GPU temperature without using any third-party tool. Microsoft has added this functionality to Task Manager in Windows 10 18963 and newer builds. The GPU temperature can be monitored from the Performance tab.
However, there are some requirements for Task Manager to display GPU temperature. This feature only works with dedicated GPUs and not with onboard or integrated GPU cards. You may also need an updated graphics driver to view and monitor GPU temperature. It requires an updated graphics driver to WDDM 2.4 or a newer driver model.
How to check GPU temperature in Task Manager in Windows 11/10:
Here are the steps to check and monitor GPU temperature in Task Manager on your Windows 11/10 PC:
- Firstly, open Task Manager using Ctrl + Shift + Esc hotkey.
- Now, go to the Performance tab.
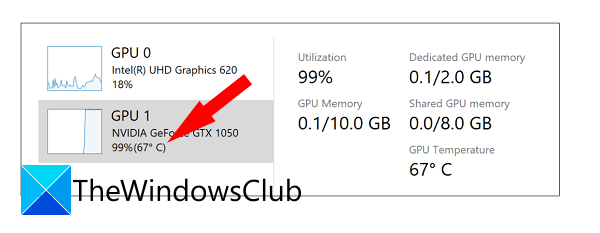
- Here, you will see the GPU temperature listed in the left pane. Simply tap on the GPU item and you will be able to view several statistics related to the GPU card including GPU temperature.
As of now, the temperature is shown in Celcius only. Apart from temperature, you can also view other GPU statistics and information including Utilization, GPU memory, Shared GPU memory, Driver version, Hardware reserved memory, and more.
2] HWMonitor

HWMonitor is a dedicated GPU monitor software or Windows 11/10. It lets you check various GPU statistics including temperature, voltage, fan speeds, powers, utilization, clock frequencies, capacities, and more. Apart from GPU, you can also monitor CPU temperature, SSD temperature and utilization, etc.
To monitor GPU temperature through this free software, download and install it on your system. After that, launch the software and it will show you numerous real-time statistics related to your hardware. Simply scroll down and you will see your graphics cards listed on its screen. Expand the detail and a Temperature component will be shown that helps you determine the real-time GPU temperature. You can also view the minimum and maximum GPU temperature values and analyze the current temperature value based on that.
This free and handy software can be downloaded from here. It also comes in a portable package that you can download and run whenever you want to check or monitor GPU temperature.
See: Best free CPU Temperature Monitor and Checker software for Windows 11/10.
3] GPU-Z
As the name suggests, GPU-Z is a dedicated free GPU monitoring software for Windows 11/10. Using it, you can check GPU temperature and many more statistics related to your graphics card. It supports NVIDIA, AMD, ATI, and Intel graphics devices to monitor GPU temperature. So, if you have any of these GPU cards, you can easily monitor their temperature. You can also view adapter, GPU, and display information. Other than that, it displays overclock, default clocks, and 3D clocks.
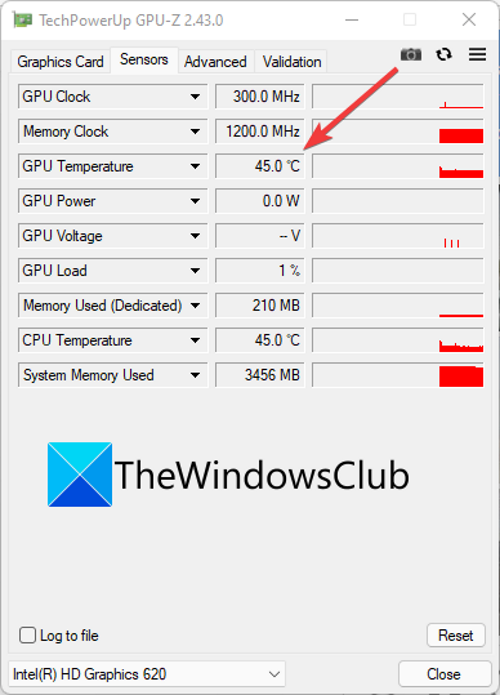
Simply download this software and launch the application directly. As it is portable, you don't need to go through an eventful installation process to use it. After starting the application, go to the Sensors tab and you will see the real-time GPU temperature with a small graph. On clicking the drop-down button present next to GPU Temperature, you can view current, lowest, highest, or average reading. Additionally, it also lets you show the GPU temperature in the window title.
If you have multiple GPU cards, you can select the one you want to monitor from the bottom of the Sensors tab. Apart from temperature, you can check statistics like GPU clock frequencies, GPU Voltage, GPU Load, CPU Temperature, System Memory Used, and more.
By default, it shows GPU temperature in Celcius. If you want to change the temperature unit to Fahrenheit, click on the three-bar menu button present at the top and then move to the Sensors tab in the Settings window. From here, enable the Temperature sensors use Fahrenheit checkbox. Also, you can set up the screen refresh rate and statistics you want to see.
Read: Core Temp: Measure & Monitor CPU Temperature on Windows.
4] Sidebar Diagnostics

Sidebar Diagnostics is another free GPU monitor software for Windows 11/10. It is basically a system information checking tool that shows you advanced information related to your operating system, CPU, RAM, GPU, Storage, Drives, Audio, and Network.
Download and install this software and then start its GUI. It will now be added to the sidebar on your desktop screen and will show you GPU temperature and many more real-time statistics.
You can also visualize the GPU statistics graph by clicking on the graph icon from the top of the sidebar. It lets you can customize the metrics and duration of the graph as per your requirement. You can customize various settings related to this software such as sidebar width, polling interval, UI scale, click through, background color, background opacity, font size, font color, date format, alert blink, and more.
It lets you customize hotkeys for various events including toggle, show, hide, switch edge, switch screen, reserve space, etc.
You can get it from github.com.
See: GPU Shark makes monitoring your NVIDIA and AMD GPU Cards easy.
5] Open Hardware Monitor

Open Hardware Monitor is a free and open-source hardware monitoring software that lets you check GPU temperature and other statistics. It lets you monitor the temperature, fan speeds, voltages, load, and clock speeds of your computer. It supports ATI and Nvidia video cards for GPU monitoring. Along with GPU, you can also monitor the SMART hard drive and CPU temperature using it.
It is a portable GPU temperature monitoring software that works without installation. So, just download its ZIP folder, extract it, and then launch the application. On its main interface, you can view different components including CPU, SSD, Memory, and more. You can scroll down and there will be your GPU card listed along with its temperature. It also shows the minimum and maximum values for temperature and other metrics so that you can maintain the required values.
Furthermore, you can also customize several parameters related to the statistics that are being displayed. For example, you can change the temperature unit from Celcius to Fahrenheit. You can also adjust log intervals, enable sensor logging, select plot location, select which hardware you want to monitor, etc. Apart from that, you can also view the statistics graph, enable the monitoring gadget, and view hidden sensors. From its File menu, you can also save the hardware statistics to a Text file.
Read: Furmark is a GPU Stress Test Tool to test your Graphics Card.
How to check the CPU Temperature in Windows?
Modern-day computers still experience CPU overheating which causes Windows PC to turn off on its own. The CPU overheat problems are something that you can't ignore and the excessive increase in CPU temperature can damage the motherboard and other hardware components over some time. Use these tools to check CPU temperature on Windows systems.
Read: How to show CPU and GPU temperature in System Tray.
To know whether or not your GPU is overheating, you can use any of the above-listed software. Temperature exceeding 80-85 degrees celsius is an alarm for GPU overheating. If your Task Manager can show you GPU temperature, you can open it and go to its Performance tab to see real-time GPU temperature. Else, simply download and install the third-party software we have mentioned to check whether your GPU is overheating or not.
What is a good GPU temp for gaming?
As we mentioned earlier, the ideal GPU temperature range is from 65 to 85°C for gaming. However, this may vary depending upon the GPU card you have on your system.
Will computer shut down if GPU overheats?
GPU overheating may crash your computer and you will have to restart your PC to start using it. While in some cases, it can also cause damage to your hardware. So, you (especially gamers) must always maintain the average GPU temperature and prevent GPU overheating.
Is 85 degrees hot for GPU?
Below 85 degrees GPU temperature should be fine. However, close to 100 degrees Celcius is when you should start worrying as it can crash down your PC and result in serious lasting hardware damage.
That's it!
Now read:
- Best Laptop Cooling Software for Windows 11/10.
- Best free Overclocking software for Windows 11/10 PC.
How to Check Cpu and Gpu Temp Windows 10
Source: https://www.thewindowsclub.com/how-to-check-the-gpu-temperature-in-windows